Monday, November 28, 2011

Better Than Puppy Love Cake

Years ago, my Auntie Bea introduced me to a cake made with a German chocolate cake mix, a can of sweetened condensed milk, a jar of butterscotch ice cream topping, and a tub of Cool Whip. She pokes holes in the cake and pours the condensed milk and butterscotch all over it. It seems like a lot but it soaks right in. Then she tops the whole thing with the Cool Whip. I had started to become very passionate about cooking, baking, and general eating at the time, so I remember repeatedly asking her how to make it. Even then I was a stickler about funny ingredients, so I made a chocolate cake from scratch and home made whipped cream. I liked the cake so much that I even researched it, and found that the official name for it is "Better Than Sex Cake." Since I plan on becoming a teacher and my future students might read this one day, I gave it a more PG name=). Since going vegan, I've thought a lot about that cake. I knew I could easily make a version just as good with different ingredients.

What inspired me was learning about making a caramel sauce out of coconut milk. It works just like heavy cream and doesn't taste any different. The recipe I use is inspired by this one from Comfy Belly. I use 1 can of full fat coconut milk, which comes out to 1 1/2 cups, so I use 1 1/2 cups of agave (an obvious honey replacement). A lot of recipes for "Better Than Sex Cake" call for chocolate fudge instead of caramel, so I thought it would be fun to add chocolate chips to the caramel sauce. The result is what I like to call "Fudgy Salted Cocomel Sauce." I even want to make jars of it and give them away as gifts, but I digress. Needless to say, its very good.

The topping doesn't look like the classic, snowy white Cool Whip, but I couldn't resist adding just a touch of chocolate and a bit of peanut butter. I call it "Chocolate Peanut Butter Whip." The chocolate cake is Isa Chandra's "Just Chocolate Cake" from Post Punk Kitchen. Just double it and use a 9x13 in pan. I made this for Thanksgiving with my family this year. I hope you like it!

Just Chocolate Cake
2 cups almond milk (or your favorite non-dairy milk)
2 teaspoons apple cider vinegar
1 1/2 cups granulated sugar
2/3 cup canola oil (I use safflower or coconut oil)
2 teaspoon2 vanilla extract
1 teaspoon almond extract (I just use more vanilla, a total of 1 Tb)
2 cups all-purpose flour (I used white whole wheat with great results)
2/3 cup cocoa powder (look for fair trade)
1 1/2 teaspoon baking soda
1 teaspoon baking powder
1/2 teaspoon salt

  • Preheat oven to 350?F.
  • Whisk together the soy milk and vinegar in a large bowl, and set aside for a few minutes to curdle. Add the sugar, oil, and vanilla and mix well. 
  • In a separate bowl, sift together the flour, cocoa powder, baking soda, baking powder, and salt. Add to wet ingredients and beat until no large lumps remain (a few tiny lumps are OK). 
  • Lightly grease an 9x13 in baking pan. Pour in the batter and bake for 32 to 35 minutes, until a toothpick inserted through the center comes out clean. 
  • When cake has cooled, use the back of a wooden spoon to poke many many holes into the cake. Now you can make your cocomel sauce.

Fudgy Salted Cocomel Sauce
1 14 oz can full fat coconut milk
1 1/2 cups light agave nectar
3/4 ts salt
3/4 cups dairy free chocolate chips
  • Combine coconut milk, agave and salt in a medium sauce pan over medium heat. 
  • Continue stirring for about 15 minutes from start to finish. It should be reduced to half, so 1 1/2 cups. I just pour it in a pyrex and if its not reduced to half yet, I pour it back in the pan and continue to cook and stir. 
  • Once it is reduced, turn off the heat and add chocolate chips. Stir until incorporated.
  • Pour this mixture all over the cake, seeing that it seeps into the holes. Now make the Chocolate Peanut Butter Whip.


Chocolate Peanut Butter Whip
3 12.3 oz packages Extra Firm Silken Tofu
3/4 cups dairy free chocolate chips
1/2 cup creamy peanut butter (mine was salted)
3 Tb light agave nectar
1 Tb butterscotch schnaps or non-dairy milk of choice (I use the schnaps)
1 ts vanilla
1/8 ts salt 
  • Using a double boiler or glass bowl over a pot of boiling water, melt chocolate chips together with peanut butter, agave, butterscotch schnaps, vanilla and salt. 
  • Put melted chocolate mixture and silken tofu into a food processor and process until smooth and silky. 
  • Spread onto cooled cake.

Monday, November 14, 2011

Impromptu Tempeh Tacos


I have a famous recipe for tempeh tacos that are loved by my husband and friends, but these are impromptu ones I made last night. It was well past dinner time, Jason was starving, and I knew I needed to make something fast. Thankfully I had a package of tempeh in my fridge, corn tortillas, and  green bell peppers and tomatoes from the farmers market. I can't believe they still have tomatoes! Also, it helps that I always have cashews in my freezer and tablespoon sized lemon cubes to make a quick ranch dressing. I keep lime cubes too which came in handy for the salsa.

The best part about tempeh tacos are the crispy tempeh kernels. My sissy in law says they are like corn nuts. The way to achieve this is to crumble up the tempeh and drop it into a shallow pan of very hot oil. Then you must leave it undisturbed until the sides are golden brown. Flip, then repeat. When you read about how to prepare tempeh, many will say to steam it first to get the bitterness out. I find that to be completely unnecessary for crispy tempeh kernels. The only time I steam tempeh is if I need to infuse moisture in it to make a patty, like Isa Chandra's famous Chesapeake Tempeh Cakes. This recipe makes about 8 tacos. Top with my ranch dressing and even some sliced avocados if you like. Enjoy!

Crispy Tempeh
1 8 oz package tempeh
1/2 ts salt
1/2 ts garlic powder
1/2 ts cumin
1/2 ts paprika
2 Tb olive oil
  • Crumble tempeh into a large bowl and mix in salt and spices.
  • Heat olive oil in a saute pan over medium heat until oil is shiny, but not smoking
  • Drop in tempeh and listen for the sizzle. If it is not sizzling, your  oil is not hot enough.
  • Give it a little shake to make sure its spread evenly over the pan, then leave it alone! Allow it to get nice and golden underneath.
  • Flip, repeat.


Simple Salsa
3 diced roma tomatoes
2 diced small green bell peppers
1 Tb lime juice
1/2 ts salt
pepper

Saturday, November 12, 2011

Thanksgiving With Friends 2011 Recipe Round Up


I know Thanksgiving is typically reserved for family, but this is the second year in a row that I've hosted a Thanksgiving party for all my friends, with an all vegan spread made by yours truly. Long before going vegan, I developed a love and passion for cooking. It started toward the end of my college years. Allrecies.com became my Bible, and I would pour over cooking magazines and cookbooks. I remember throwing huge dinner parties and making mashed potatoes with bacon, BLT salad and fried chicken. Cooking became my creative expression. It was my way to share the best of myself with those I care about. Now that I'm vegan, my passion for cooking has only intensified, and I love showing people how delicious plant based food can be. As a vegan in a meat eating world, cooking for others also allows me to share who I am and what I'm about in a healthy and positive way. Then I am free to be myself without feeling the need to talk about veganism, because it speaks for itself. In my interactions with the world, I believe every single thing needs to be positive, and nothing is more positive than good tasting food with good friends. This years crowd was quite big, a total of 20 people, 5 of which were kids who were too busy playing to be in the picture. Three of them are new vegan friends that I've made in my area, because every vegan needs a few vegan friends! As you can see from their faces, every one was having a great time. Ironically, the Thanksgiving meal is one of the easiest to veganize. All it is is a bunch of carbs and a turkey, easily replaced by Tofurky, aka, the "beige ball." Thats just what I like to call it! Its a little intimidating right out of the package, but if you cook it right, its even BETTER than turkey. All the meat eaters said so.

Here's Jason cutting the "bird"
Jason was kind enough to take individual pictures of each dish, but the lighting wasn't up to my standards, so I'll apologize for that now. This blog post is a round up of my recipes for any one who wants to host a vegan Thanksgiving of their own. 

The process for Tofurky is quite simple. Just make sure to take it out of the freezer and put it in the fridge 24 hours before cooking. The best way to prepare it is to rub it down with oil and spices, wrap it in tin foil, and cook it for 1 hour at 350 degrees. 1 Tofurky serves about 8-10. I made 2. Here are my rub ingredients for 1 Tofurky.


Tofurky
1/4 cup olive oil
1 Tb soy sauce
1 ts garlic powder
1/2 ts poultry seasoning

I've been a pro at mashed potatoes since long before my vegan days. It all started when I watched my Auntie Bea make it with Carnation Evaporated milk and multiple sticks of butter. I knew that was the reason hers tasted so good, and for years I insisted on making them that way. These days, I still believe that mashed potatoes should be rich and creamy, just plant based. The biggest mistake people make with their mashed potatoes is not using enough salt. Potatoes are incredibly bland so don't be afraid to use it. I know this dish isn't the prettiest, and once again, I apologize! I clearly needed a bigger dish right? The potatoes actually started to bubble over onto the bottom of the bottom of the oven. Despite the way it looks, it was a huge hit. I used a box of unsweetened mimic cream, which is an almond and cashew blend, but next time I will use a homemade cashew cream. Here is my recipe that serves 20 people.


Mashed Potatoes
5 lbs organic red potatoes
1 cup olive oil
1 cup veggie broth
4 cups unsweetened mimic cream
8 ts salt
1 Tb garlic powder
1/2 cup diced green onion
  • Boil potatoes in a huge pot until fork tender
  • Drain potatoes and add them back to the pot. Allow excess water to cook out
  • Add remaining ingredients except for the green onion and mash or beat, depending wether you like them chunky or silky smooth. Don't ever over beat your mashed potatoes, or they will turn gummy.
  • Put potatoes in a larger than 9x13 in casserole dish
  • Bake for 1 hr at 350 degrees

My corn bread stuffing was another huge hit. I couldn't find a bag of Imagine brand stuffing mix at any store, and I refused to buy a bag of Rainbow bread cubes or Pepperidge Farms stuffing mix with high fructose corn syrup, so I knew a corn bread stuffing would be the way to go. I just used the recipe on the bag of Bob's Red Mill Corn Meal, subbed applesauce for the egg, and doubled the recipe to fit into a 9x13 in pan.


Corn Bread
2 cups all-purpose flour
2 cups corn meal
1 ts salt
8 ts baking powder
2 Tb sugar
2 cups almond or soy milk
1/2 cup applesauce
1/2 cup olive oil
  • Preheat oven to 350 degrees
  • Combine the dry ingredients 
  • Combine the wet ingredients
  • Add wet to dry, and mix just enough to incorporate. Do not over mix.
  • Pour in a 9x13 in baking pan. 
  • Bake for 30 mins
  • Allow to cool
Corn Bread Stuffing
1/2 cup olive oil
1 large diced yellow onion
2 cups diced carrots
2 cups diced celery
2 cups diced apples
3 cups veggie broth
8 ts salt
2 ts garlic powder
1 ts poultry seasoning
1/2 cup green onion
Corn bread recipe (see above)
  • Add olive oil to large pot on medium heat
  • Add onion, carrots, and celery and saute until onions are transluscent
  • Add apples and continue to cook for another 2 minutes
  • Break up corn bread and add to the veggies and apples
  • Add remaining ingredients and incorporate 
  • Put stuffing into a 9x13 in baking dish 
  • Bake for 1 hour at 350 degrees

Of all the dishes, my sweet potato casserole was raved about the most and was the first to go. Next time I will make more. The funny thing is, I didn't make as much as the other sides because I always thought a lot of people don't eat sweet potatoes, but that certainly wasn't the case with these ones. Their favorite part was the topping. They kept asking me what was in it. Well, here's the recipe.


Sweet Potato Casserole
3 lb organic sweet potatoes
1/2 cup Spectrum Organic Shortening
1/2 cup soy or almond milk
1/4 cup light agave nectar
1/2 ts salt
Topping ingredients:
1/2 cup Spectrum Organic Shortening
1/2 cup brown sugar
1/2 cup all-purpose flour
1/2 cup raw almonds
1/2 cup raw walnuts
1/2 ts salt
  • Turn the oven on to 350 degrees and put the sweet potatoes on a baking sheet
  • Prick a few holes in the potatoes with a fork and bake until fork tender, about 1 hr and 15 minutes
  • Once the potatoes are cool enough to touch, the skin should come right off
  • Add them to a mixing bowl and add shortening, milk, agave and salt. Use a strong fork or wisk to incorporate all ingredients
  • Put the sweet potato mixture into an 8x8 in casserole dish
  • Put almonds into a food processor and pulse a few times until crumble, not too long, or it will turn into butter
  • Add remaining ingredients and pulse until all ingredients are incorporated
  • Crumble the mixture on top of the potatoes
  • Bake for 1 hour at 350 degrees

My roasted veggies were just roasted veggies that anyone could do, so I won't bother posting the recipe. What I will say is, next year I will do a huge salad instead so I have more oven space and I can make flaky biscuits and more of the other stuff. I'd love to have two ovens, but thats a first world problem isn't it?

My classic Thanksgiving gravy is so good I've made it on other occasions as well. I came up with it by studying various recipes from the internet and can truly call it my own. I find that the all-purpose vegetable seasoning I use is crucial to this gravy, so if you can't find this certain brand, you may have to tweak it a bit.


Classic Thanksgiving Gravy
1/2 cup olive oil
3/4 cup brown rice flour, spelt, or whole wheat
8 cups veggie broth
1 cup nutritional yeast
3/4 cup soy sauce
1 ts salt
2 ts garlic powder
1/4 cup Aromatica Organics All-Purpose Vegetable Seasoning

  • In a large pot on medium high heat, add olive oil and flour. Stir constantly until roux is peanut butter brown
  • Add veggie broth, stirring continuously 
  • Stir in remaining ingredients
  • Increase heat and bring to a boil. Reduce heat and simmer for approximately 40 minutes

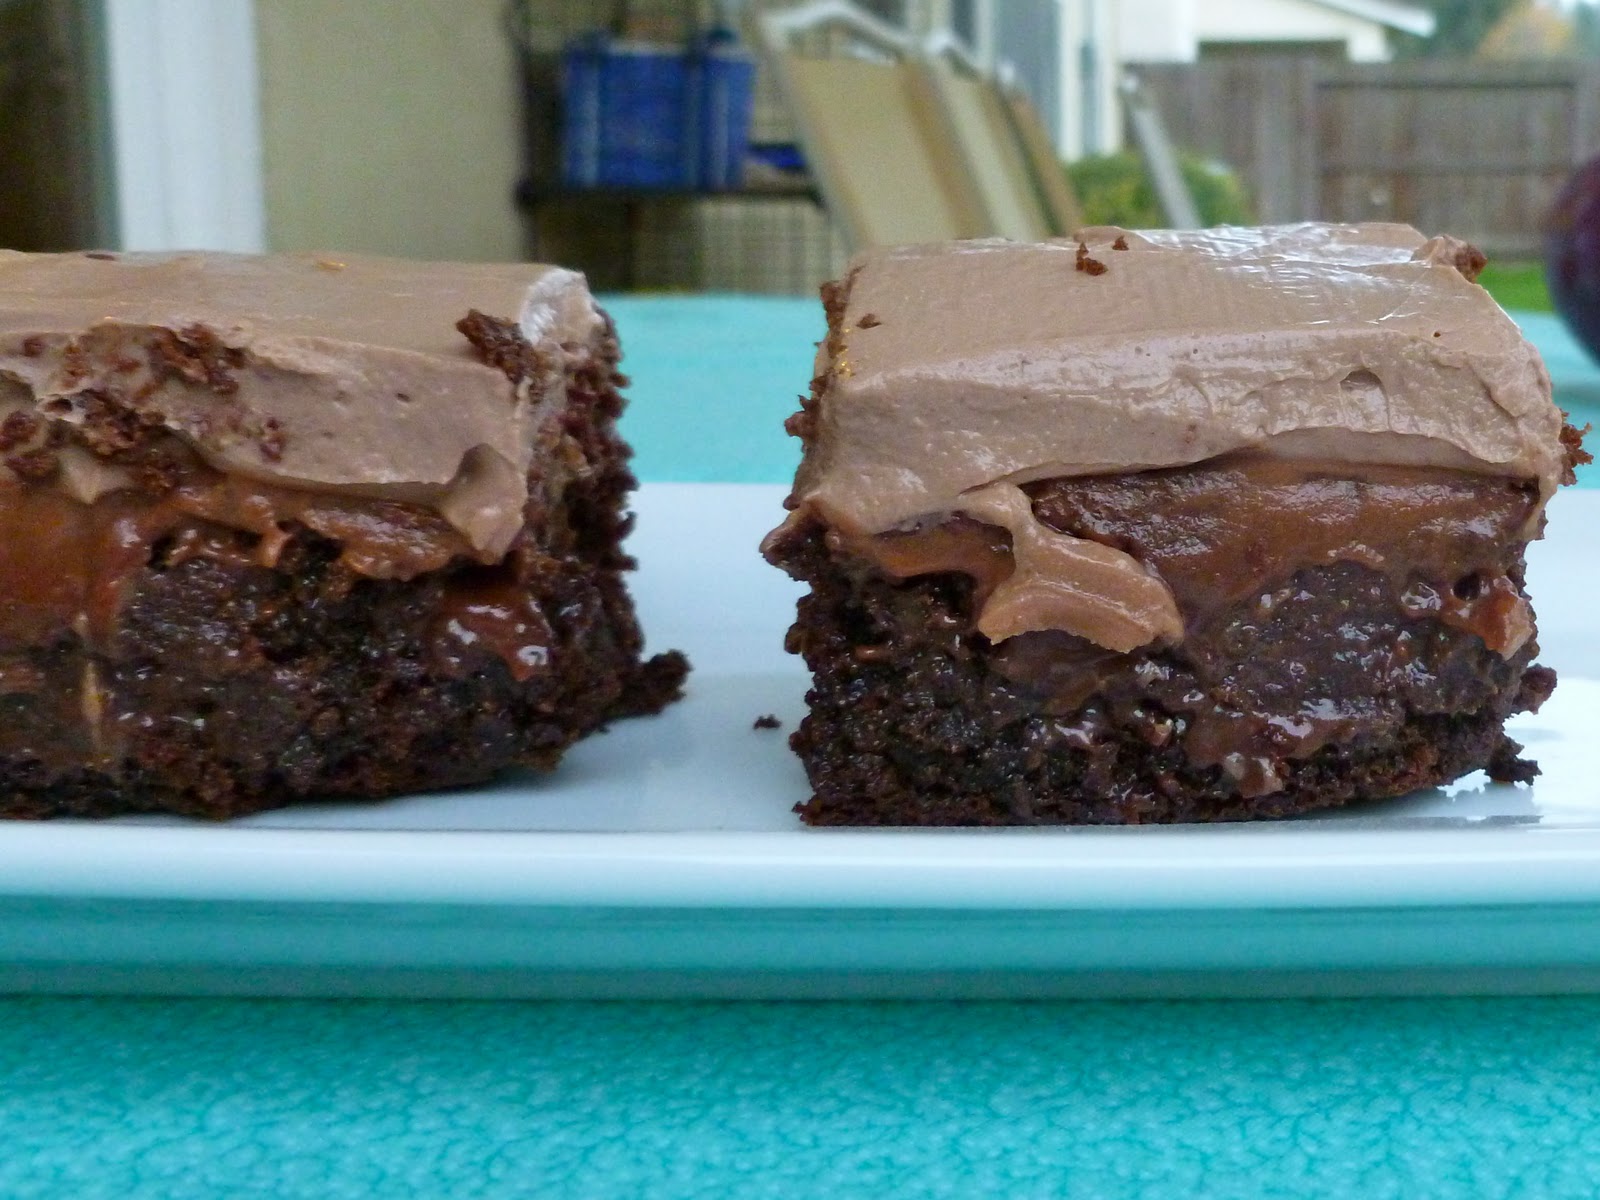
My chocolate cake is a long story, but I'll do my best to retell it. A few posts back I made the Chocolate Mousse Cupcakes from Post Punk Kitchen, only our printer wasn't working at the moment, so I had to write the recipe down. Why wasn't our printer working? Well we later found that Ava had stuck pens in there. I can't get mad at her because she's only two, and once we took them out it worked just fine. So anyway, I decided to double that recipe for this cake, but as I read the actual recipe on the PPK Website today, I found that I was missing a key ingredient, baking soda. No wonder it was so dense! Every one still liked it, but I will certainly add the baking soda next time. I was going for the classic Better Than Sex Cake that my Auntie Bea introduced me to years ago. If you aren't familiar with it, its a chocolate poke cake soaked with caramel and topped with Cool Whip. I can't say if its better than sex or not, but its really good. I made this Caramel Sauce from Comfy Belly and it was divine. I like to call it Salted Cocomel Sauce. Just use coconut milk and light agave instead of honey. Next time when I use baking soda, the cake will be fluffier and absorb more caramel, and I will double the caramel. The whipped topping is the Mimic Cream brand that comes in a small box. Half of it is sandwiched between the two layers, and the other half is whipped with a chocolate ganache and spread around the whole cake. Oh, and Isa Chandra actually uses her same cupcake recipe for her Chocolate Cake on the PPK Website. I actually quadrupled the recipe because each layer is double. I'm not going to bother posting this recipe until its totally perfected, but like I said, people still liked it! All together the party was a smashing success=)

Saturday, November 5, 2011

Alicia Silverstone's Peanut Butter Cups That Stay Firm at Room Temperature


These are my version of Alicia Silverstone's famous Peanut Butter Cups. Just one bite will make you forget about Reese's like Romeo forgot about Rosaline. When I first made the original recipe in my early vegan days, I realized that the peanut butter part doesn't stay firm at room temperature. This is problematic if you want to leave them out at a party, or better yet, give them out as a gift. My solution is agar-agar powder. I'm not sure why they named it twice, but agar-agar is a natural stabilizer derived from a sea weed.

The original recipe calls for Earth Balance Butter, but now that I know about the destruction of the rain forests from palm oil production, I use Spectrum Shortening, which uses organic palm oil. It has no transfats and the only ingredient is palm oil. Instead of maple sugar, I've used unrefined cane sugar, but I recently decided to take a chance with maple syrup and it worked great. I'm sure agave or brown rice syrup would work great too. For the graham cracker crumbs, I've used crushed up Annie's Chocolate Chip Bunny Grahams, because they are honey free, but I've recently discovered something even better, which is Barbaras Oatmeal Snackimals. They are whole grain and wheat free for anyone who is intolerant, although they are made in a wheat processing facility.

I made these for Halloween and decided they are now my official Halloween tradition. Same goes for Easter. They are highly addictive though. Jason took most of them with him to work because he knew I would eat them all! I was able to make 21 mini cups. Enjoy!

3/4 cups creamy peanut butter
3/4 cups crushed Barbara's Oatmeal Snackimals
1/2 cup Spectrum Shortening
1/4 cup maple syrup
1 1/2 ts agar-agar powder
1 cup dairy free chocolate chips
1/4 cup soy, almond, or rice milk
  • Line a 24 cup mini muffin pan with paper liners
  • Prepare your crumbs by putting cookies in a food processor and process until fine. I think about 1 1/2 cups of cookies makes 3/4 cups. Store any leftovers in an airtight container.
  • Combine peanut butter, shortening, maple syrup and agar-agar in a small pot over medium heat, stirring constantly, until mixture starts to boil. Continue to cook and stir for another 1-2 minutes. Turn off heat and add the crumbs. 
  • Spoon 1 Tb peanut butter mixture into each paper liner. Allow to firm up in the fridge.
  • Combine chocolate and milk in a double boiler, or like me, you can use a glass bowl above a pot of boiling water. Stir until melted and smooth. 
  • Spoon a 1/2 Tb of chocolate into each cup. If you have a little left over chocolate, do not hesitate to use every bit of it to top off the peanut butter cups. Allow to firm up in the fridge.

Sunday, October 30, 2011

Silky Smooth Avocado Creme

Not to be confused with guacamole, this "creme," or cream, is perfect for dolloping on a taco. Try it on my Chickpea Tacos in place of the "Special Sauce." Here's what you need:

1 cup whole, raw cashews
2 Tb freshly squeezed lime juice (I always keep lime cubes in my freezer)
1/2 cup plus 2 Tb filtered water
1 ts salt
1 ts garlic powder
1 ts dried minced onion
1 Tb chopped chives
1 seeded, diced jalepeno (I always have these in the freezer from Farmers Market)
1 avocado

Simply put all ingredients in a high speed blender and blend until smooth and creamy. So simple. So easy. Enjoy!

Sunday, October 23, 2011

Potluck Tofu Scramble


This morning Jason said he wanted something hearty and decadent, like an omelette. I can't believe I just now had to look up the spelling of that word! Anyway, I said "ok," and proceeded to make my first official tofu scramble. I've made an impromptu tofu scramble for myself a long time ago, but this one is official. My formerly tofu hating husband took one bite of it and quickly approved. He couldn't believe that it tasted like eggs, and the seasonings were perfect. We both found it to be so delicious that I made a bigger batch and brought it to a potluck this afternoon. The potluck was titled,  "Anything Healthy Potluck," and every one loved it, even though it wasn't breakfast time! The recipe here is the one I used for the potluck, but cut the recipe in half for a small family.

2 packages 15.5 oz Wild Wood Extra Firm Sproutofu, or any brand will do.
2 Tb "Nootch," aka nutritional yeast
1 Tb salt
2 ts paprika
2 ts mustard powder
2 ts garlic powder
2 ts onion powder
2 large diced tomatoes
1/4 cup chopped green onion
2-3 Tb olive oil

  • Squeeze all excess water from tofu. My method is to put some in a mesh or nylon bag and squeeze the bejesus out of it, sort of like making home made almond milk. I do this in batches. Another method is to lay the blogs on a paper towel lined cutting board, top with more paper towels and a heavy bottomed skillet. Allow to sit until a lot of water is absorbed, change paper towels, and repeat until most of the water is absorbed.
  • Mix tofu and spices in a bowl until all ingredients are incorporated.
  • Heat 1-2 Tb olive oil in a large skillet over medium high heat. When oil is hot but not smoking, drop half the amount of tofu in the skillet and leave undisturbed for about 5 minutes, until golden and crisp underneath. Flip using spatula, and continue to cook until golden. Transfer to a large dish or container.
  • Add 1 Tb olive oil to the skillet and continue to heat over medium high heat. Drop remaining tofu into the skillet and repeat above steps. Once its finished cooking, turn off heat and immediately add the tomatoes and green onion. Mix until all ingredients are incorporated, and add the first batch of tofu. 
Of course, you could fry the tofu in one batch if you like, but I did it in two so that as much surface area as possible got crisp and golden. Here's mine in pita, enjoy!

Tuesday, October 11, 2011

Chocolate Mousse Cupcakes from Post Punk Kitchen


Hey every one! I haven't forgotten about my blog, just took a little break. I made these cupcakes for my friend Celeste's birthday on Sunday. She's one of my best friends from high school. We didn't go to the same high school, but I've known her since then. She's the kind of friend who knits blankets for people's kids and says a prayer for them while knitting. So I brought these to our lunch date and all my girlfriends loved them. Most importantly, Celeste brought them home to her husband who also loved them. He's known for having a voracious sweet tooth, so I definitely had him in mind. My own hubby loved the thick, mousse frosting. 

The recipe is from the famous Isa Chandra Moskowitz and can be found on her website Post Punk Kitchen. She's the author of many cookbooks and is truly the go to person for all your baking and cooking needs. Although I must say, the batter was only enough for 9 cupcakes, as opposed to the 12 that the recipe states. Also, I had twice as much frosting as needed. Thats ok Isa, I still love you! In fact, it worked out great because the next day I made another batch and used up the rest of the frosting. If you make these, I recommend doubling the recipe for the cupcakes and keeping the frosting the same. Also, I personally would add a little salt to the frosting, just to bring out the flavors. 

The frosting could even double as the filling for a chocolate mousse pie. Just pour it in a pie crust and chill for an hour. Then I would top it with this amazing looking Coconut Cream Topping from Vegan Dad. It looks so easy and perfect! 

I won't bother re-posting the recipe for these cupcakes, because the only change I made was that I used coconut oil in place of the canola. It gave them a nice, subtle coconut flavor. Normally, I would also sub a whole grain flour instead of all purpose, but I am trying to use up my last bag of white flour. Mine baked up in 20 minutes. Enjoy!


Sunday, September 25, 2011

Chickpea Tacos with Special Sauce

I call the sauce "special" because I'm not quite sure what to call it, but it is silky, creamy, and full of flavor and spice. It starts with my Cashew Sour Cream inspired by My New Roots, which I also use as the base for my Cashew Ranch Dressing. For my Special Sauce, I add roasted garlic and jalepeno, just like I did for my Roasted Garlic and Jalepeno Aioli. I always keep jalepenos from the farmers market in my freezer so I have them on hand.
  • First remove the paper from 1 large head of garlic
  • Seed and dice 1 jalepeno pepper
  • Put garlic and jalepeno into small rameken
  • Drizzle over 1 Tb olive oil to coat the garlic and jalepeno
  • Cover with tin foil and bake in a 350 degree oven for 30-40 minutes. I usually don't preheat, and ovens vary. Just make sure the garlic is soft enough to mash with a fork, but not burnt, just a slightly more brown color.
This is what it looks like before going into the oven
This is what it looks like out of the oven
In a magic bullet or other high speed blender, put in
  • roasted garlic and jalepeno, including the bit of oil left in the rameken 
  • 1 cup raw, whole cashews
  • 1/2 cup plus 2 Tb filtered water
  • 2 Tb Lemon juice 
  • 1 ts salt
  • 1 ts paprika
  • 1 ts cumin
Blend until smooth and silky. It should look just like nacho cheese. In fact, if you add 2 Tb of nutritional yeast it would be the best nacho cheese sauce ever.
For the chickpeas, you need
  • 1 15 oz can chickpeas, drained
  • 1/2 ts salt
  • 1-2 Tb olive oil or coconut oil (I prefer coconut oil for frying, but I used olive oil this time)
Mash chickpeas with your hands but not completely so they still have some texture.
Heat oil on medium heat
Add chickpeas and leave undisturbed until edges are golden brown
Flip chickpeas and continue to cook until golden brown
Assemble the tacos however you want! I did mine in this order:
  • corn tortilla
  • special sauce
  • lettuce leaf
  • chickpeas
  • tomatoes
I made these for my two special guys, Jason and his best friend Gil. This is the time of year when he comes by every sunday and watches football. He's always been a big lover of my cooking, and these were thoroughly enjoyed by the three of us. See, even meat eaters can love plant based food if its made with flavor, passion, and love. Enjoy!


Sunday, September 18, 2011

Ooey Goey Chocolate Cookie Bars

Hi. My name is Anneka Schneider, and I'm a sugar addict. I have since grown up from the typical college addictions like drinking and partying. Now, its all about the sugar. Its both my friend and my enemy, but I did this for you my friends. That's my excuse at least.

The mind of an addict is always thinking of different ways to ingest the drug of choice. In this case, I couldn't just do a simple cookie. I had to do a cookie bar with an ooey gooey layer on top. The chocolate cookie layer is the Chewy Chocolate Chocolate Chip Cookie recipe from Post Punk Kitchen. I just cut the recipe in half, omitted the chocolate chips, and pressed it into my Perfect Brownie Pan. Ever seen it on TV? Its the brownie pan with a grid to make perfect squares. Well, I didn't use the grid, but I like that the bottom is detachable so that I can easily lift it out of the pan. The top layer is made of peanut butter but tastes a lot like caramel. Enjoy!

Preheat oven to 350 F.

Chocolate Cookie Layer
6 Tbs safflower, peanut, or coconut oil
1 cup sugar
1 ts vanilla
2 ts whole or ground flax seeds
1/4 cup soy, almond, or rice milk
1 cup all purp or flour or white whole wheat
6 Tb cocoa powder
1/2 ts baking soda
1/4 ts salt

Blend milk and flax in a blender for 30 seconds or so. Set aside.

In a large bowl sift together flour, cocoa, baking soda and salt.

In a seperate large bowl cream together oil and sugar. Add the flax seed/soy milk mixture and mix well. Add the vanilla.


Pour wet mixture into the dry ingredients and beat until everything is incorporated. 


Press into a lightly oiled 11x7 in brownie pan.

Ooey Goey Layer
1 cup pb
1 cup sugar
1 ts vanilla
1/2 cup almond, soy or rice milk

Beat ingredients till smooth. Mixture will be thick. Pour onto the cookie layer and spread evenly, being careful not to break up the cookie.

Bake for 35 minutes. Allow to cool before cutting into squares.

Monday, September 5, 2011

Green Enchiladas with Daiya Cheese and Gardein Chick'n Scalopini

Wow. These enchiladas are oozing with cheesy, creamy, faux meaty goodness. I've been on a mission to use up everything in my freezer, pantry, and fridge so I can go on a major food shopping spree. One of the things in my freezer from my early vegan days was a package of Gardein Chick'n Scallopini. I simply had to use it, along with a package of Daiya mozzarella, which I just bought for these enchiladas. If you want something super cheesy, this is the dish for you.

Even more creaminess comes from the cashew cheese, which comes from my original nacho cheese recipe. I used pine nuts in my original recipe because they blended up so easily, but now that I have a super high powered Ninja Pro Blender, cashews work beautifully. I just omitted the paprika to keep it white. Enjoy!

Cashew Cheese
1 1/2 cup raw cashews
3/4 cup filtered water
3 Tbs lemon juice
2 ts salt
1 ts white miso paste
1 ts garlic powder
1 ts onion powder
3 Tbs nutritional yeast

Blend in high speed blender until smooth and creamy

Enchiladas
6 La Tortilla Factory grande white corn tortillas
1 package Gardein Chick'n Scallopini
Olive oil
1 package Daiya mozzarella
cashew cheese 
1/2 cup chopped green onion
2 Tbs chopped parsley
1 12 oz jar salsa verde
green tomato slices (optional)
  • Thaw chick'n scallopini and chop into small pieces
  • Saute chick'n scallopini in olive oil on medium heat in a non-stick skillet until browned on both sides.

  • Prepare cashew cheese
  • In a large mixing bowl, mix together cashew cheese, Daiya cheese, chopped scallopini, green onion, and parsley
  • Line the bottom and sides of a 9x13 in baking dish with a touch of olive oil and the salsa in order to prevent the enchiladas from sticking
  • Spoon cheese mixture into a large corn tortilla, roll, and arrange in the baking dish. Repeat until all the mixture is used. Should be enough for 6.


  • If you like, top with green tomato slices. This is a good trick to prevent the sauce from drying out in the oven.


  • Bake in a 350 degree oven for about 30-40 minutes.

Yum!

Saturday, September 3, 2011

Vegan Chili Cheese Nachos

The ultimate street food enjoyed in the comfort of my own home. This is a modification of the highly acclaimed Nacho Cheese Dip from Shmooed Food. I wanted something quick and easy to serve my best friends who came to visit me last night for my belated birthday. 

One of them was the mastermind behind the best gift a vegan could get. Not a gift card to Vegan Essentials, but a donation in my name to Farm Sanctuary, an organization so close to my heart. Thats what friends are for=)

Anyway, back to the nachos. All I did was increase the amount of salt and seasonings and added paprika. Other than that, followed the directions exactly. This nacho cheese sang to me, and thats how I knew it was good.

2 cans of chili is enough for 4 people. The cheese recipe makes 2 cups, enough for 4 people. Enjoy!

2 cups filtered water
1/4 cup raw cashews
One 4 oz. jar pimentos, drained
1 cup nutritional yeast flakes
2 Tbs cornstarch
1 Tb fresh lemon juice
2 ts salt
1 ts onion powder
1 ts garlic powder
1 ts cumin
1 ts paprika

I know I've talked about this, but I always have lemon ice cubes in my freezer to make my life easier. 1 cube equals 1 Tb. If you use lemon juice often like me, I highly recommend it. Combine all ingredients in a high powered blender until completely smooth. I just got the amazing Ninja Pro. I'm a total As Seen On TV groupie! Transfer mixture to a medium saucepan and whisk constantly over medium heat until thickned, about 5 to 6 minutes.

Saturday, August 27, 2011

Mai Fun Noodle Bowl

Hey everyone! Thursday was my birthday and I didn't go out to dinner. Is that crazy? I know its an unwritten rule that you have to go out to some establishment or at least order pizza, but I was craving something made by yours truly, plus I had all the ingredients for a soul satisfying fun bowl that took me no time to make. Jason said this was the most flavorful noodle soup I've ever made. The secret is the Better Than Bouillon No Chicken Base. Its not a powder. Its a thick liquid the color of turmeric. The dried mushrooms are a gourmet blend of Porcini, Morels, Brazilian, Ivory Portabellas, Shiitake, and Oyster. Check out this huge container I got from Costco! I hope they don't stop selling it!
The broth is also flavored with dried kombu, which is a sea weed. I got mine at Whole Foods, but if you can't find it, I'm sure the soup will still be great. This recipe makes enough for 4 servings. Enjoy!

Ingredients
4 cups filtered water
2 sheets dried pacific kombu
2  large handfuls dried gourmet mushrooms (the ones I mentioned above)
4 Tbs white miso paste
3 Tbs soy sauce
2 Tbs Better Than Bouillon No Chicken Base
1 ts garlic powder
1 ts minced ginger (mine is from a jar by The Ginger People)
1 ts Sriracha
8 oz Annie Chun's brown rice noodles a.k.a Mai Fun
1 bunch baby bok choy, roughly chopped
1 Tbs chives

Directions
  • Fill a large pot with water and bring to a boil
  • Add noodles and boil for 1-2 minutes, stirring occasionally
  • Drain and rinse under cold water
  • In a large pot, soak the kombu and dried mushrooms in the filtered water for 15 minutes
  • Bring water to a boil, then reduce to a simmer and cook for 10-15 minutes
  • Remove kombu and add miso paste, soy sauce, No Chicken Base, garlic powder, ginger, and Sriracha
  • Stir broth ingredients together and add bok choy, stirring until the bok choy is wilted
  • Add noodles and chives

Saturday, August 20, 2011

New Favorite toy: My Omega 8003 Juicer


The Omega 8003 juicer is a single gear masticating juicer. At 80 RPMs, I get quality juice.


Jason getting in on the action. He still doesn't really understand the point of juicing, but he likes to push the fruit through the chute! He really wanted to try juicing grapes, so I let him after we made my green juice.
Check out my bone dry pulp!
I call this drink the Asian Persuasion: 1 bunch tatsoi spinach, 4 asian pears.  I'm a newbie to green juices so I need a lot of fruit! Happy juicing everybody!


Friday, August 19, 2011

Taco Night With Mr. Butler

So I had no intention of blogging about these, until I saw and tasted the end result. Its past midnight and I would rather write this than sleep. So first of all, I don't know exactly who invented Soy Butler Curls, but I imagine his name is Mr. Butler. Perhaps I am thinking of the show Mr. Belvedere from when I was a kid, and I am just combining the two. Nonetheless, chickens everywhere are clucking his praises. These soy curls aren't some scary faux meat with a list of scary ingredients. In terms of processing, they are the equivalent of tofu as far as I can tell. Ingredients are: Whole, textured soy beans. Thats it! They are packaged in a dehydrated state. Just soak them in water for about 10 minutes, then squeeze them super hard to get all the water out. What makes these soy curls superior to animal flesh is that they are like a sponge, absorbing all the yummy marinade. 


Speaking of marinade, thats the part I really want to share! See, it starts with my new favorite toy, the Omega 8003 juicer. This thing is amazing. I get a bone dry pulp and quality juice. 
 
So anyway, I had a bunch of veggies in my fridge that I wanted to use up. Why? Because I'm going to Farmer's Market on saturday and I like to have a clean slate when I go there. I'm like a kid in a candy store when it comes to Farmers Market. This is when I got the idea to use veggie juice as my marinade.
This was my step by step process:

  • First I juiced two oranges in my regular citrus juicer, about 1 cups worth.
  • Then I added 4 Tbs of lime. I actually make lime cubes in advance like I do lemons. 1 Tbs per cube. We have an awesome tree. 1 lime=2 Tbs. Now for the veggie part. 
  • I had tomatoes, red onion scraps, anaheim chile peppers, and even a bunch of parsley from my garden that I didn't use all of from something else. The majority of this juice came from tomatoes and chile peppers. In the end I had about 3 cups worth. 
  • I added this to the orange juice mixture, along with 1 Tbs salt, and 1 ts each garlic powder, cumin, and paprika. This is why I wasn't going to blog about it, because I just put a bunch of veggie scraps in the juicer. Who would've thought it would turn out to be so exquisite?
  • I had a lot of marinade, so I used it in place of water to cook some Lundberg's black rice. I love black rice! I used 1 cup of black rice, 2 cups marinade, and put it in my rice cooker on the brown rice setting.
  • I also had some corn, which I combined with the cooked rice. 
  • Then I fried the soy curls to a crisp using a small amount of peanut oil in my large eco friendly non-stick skillet. 
  • Next, I combined the soy curls with the black rice and corn. At this point, I knew I had a good thing going. Now all I had to do was fry my tortillas. I don't usually fry my tortillas, but it just felt right this time.
  • This part is pretty easy to figure out. Just put a shallow amount of oil in a small non-stick skillet on medium heat. 
  • When the oil is hot enough, drop in a tortilla, let it get golden brown, flip it over to brown the other side. I also used the big pan that I used to fry the soy curls, so I had two pans going.
Jason kept saying how good these were. He especially loved the juice that was seeping out with each bite. These were so awesome! And I love that I didn't plan on making something this good. Thank you Mr. Butler!

Thursday, August 18, 2011

Brown Rice Crispy Treats

I made these on a whim, my own personal recipe. Well, I've read a lot of different ones, like the one herehere, and here. I guess this is a combo of them all. I'm actually obsessed with brown rice syrup. I've always been a huge caramel fan, pronounced car-a-mel, for all you car-mel people! Seriously though, pronounce it however you like, and if you like caramel, you will love brown rice syrup. Your blood sugar will thank you for eating it too, cuz it won't spike like it does with the refined stuff. Upon biting into these I thought they weren't very sweet, but then I got used to it and it became a good thing. That way you could also eat these for breakfast and not feel like a sugar junky!
You need:
4 cups brown rice cereal
3/4 cups salted peanut butter
1/4 cup peanut oil
1/2 cup brown sugar
1/2 cup brown rice syrup
1 ts vanilla
9x9 brownie pan
  • Line a 9x9 brownie pan with saran wrap
  • Combine all ingredients except cereal in a large pot on medium heat
  • Use a whisk to stir occasionally 
  • When it comes to a bubble, continue stirring for another two minutes
  • Turn off heat and pour in the cereal
  • Incorporate all ingredients using a rubber spatula
  • Pour into saran wrap lined brownie pan
  • Press surface down with rubber spatula
  • Allow to cool for 1 hour before cutting into squares (Lift it out with the saran wrap and remove the saran wrap first, duh!)
  • Enjoy!


Wednesday, August 17, 2011

Mobetta Vegan Deviled Eggs With Caviar

I am so impressed with the way I reinterpreted these deviled eggs by Monique a.k.a Mo at Mobetta Vegan. The key ingredient here is the black salt. It has a sulfuric quality identical to egg yolks. I read about black salt a while back in Isa Chandra's Vegan Brunch, but of course it wasn't available at any grocery grocery store and I never bothered to order it online. Then a few weeks ago, I saw a package of Hawaiian Black Salt at Marshalls for just $1.99. I know, its not the Indian kind specified in these types of recipes, but I figured it would be close. Well, lo and behold it really did have that egg like quality. In fact it was dead on. Mo uses the black salt in the bean spread, but I sprinkled it on top in place of her vegan caviar. Thats the genius part! Also, I used chickpeas instead of white beans because thats what I had on hand. 

I ate half the tray in one sitting. Later that night after running errands, I brought what was left to the in laws where Jason and Ava happened to be. We have very special family here visiting this week, so we are always there! I excitedly gave one to my tofu hating husband and he said quote, "It tastes exactly like a deviled egg." He also later said it was the best tofu he's ever had. Then when my mother in law tried one, she immediately said, "It tastes like an egg, how did you do that?" Even my father in law liked them, and I've never known him to be a tofu guy! 

I already knew I would bring them to our special family dinner the next night.

Why so special? Ava's cousin Sienna, who is just a year older than her, is visiting all the way from Hawaii! Thats where her daddy, Jason's brother, is stationed. She came with just her mommy Jolee while Daniel is on leave. All week these two girls have been running around screaming to the highest decible. 
Here they are eating corn. Ava loves corn.
Jolee's dad on the left asked if the tofu was made of "cheese" and I said, "yeah." Am I bad?! He didn't seem to notice! The kind soul on the right is my father in law.
Oh, I also brought a salad with my Cool Ranch Dressing, which my ranch loving sissy gave a solid thumbs up! By Sissy I mean Jason's sister! She never orders any thing at a restaurant without a side of ranch. Also, my father in law is lactose intolerant, so he was finally able to enjoy it as well.

Here is the recipe for the deviled eggs!

1 15 oz can chickpeas, rinsed and drained
1/3 cup Vegenaise
1 Tbs yellow mustard (I forgot to add the mustard in mine, but next time I will definitely use it!)
1 Tbs dill relish (the dill relish is part of her older recipe, you can skip it if your not a fan)
1/8 ts turmeric
1 ts garlic powder
1 ts dried minced onion
1 ts sea salt
1 ts Hawaiian Black Salt for sprinkling
1 1/2 packages 15 oz extra firm tofu

I skip the part in her recipe that says to boil the tofu in vinegar and water. Slice the tofu into squares. I got 27 I think, but that will vary depending on how thick you slice it. Place squares on top of a paper towel lined plate, and place another paper towel on top to pat dry.

Puree all ingredients except for black salt and tofu in a food processor until smooth. Store in the fridge for at least 40 minutes to help it firm up, then pour into a piping or sandwich bag. Pipe the bean spread onto the tofu squares and sprinkle with black salt. A sprinkling of paprika and chives would be good too.

If your a vegan and miss deviled eggs, give these a try! Next time I'm going to make an egg salad sandwich by crumbling up the tofu and mixing it with the bean puree and black salt.

Read more about black salt and other cool salts here.

Enjoy the rest of your week!

Monday, August 8, 2011

Summer Time Treats: Black Bean Burgers with Roasted Garlic-Jalepeno Aioli and Bisquick Blackberry Cobbler

I love my new camera, I love taking pictures outside, and I love these black bean burgers from a blog called VegLite-Healthy Vegan Recipes. I used canned beans instead of dried, and didn't saute my onions. The spices are just a tad different, but pretty similar.

Other than the actual burger, the best part is my roasted garlic and jalepeno aioli. Before I went vegan, I loved dressing up mayo this way, and now I can do the same thing with Vegenaise. I love Vegenaise, and it will always have a place in my fridge. First I will show you how to make the Aioli.
Remove the paper from 1 large head of garlic
Seed and dice 1 jalepeno pepper
put garlic and jalepeno in a small rameken
drizzle over 1 Tb olive oil to coat the garlic and jalepeno


Cover with tin foil and bake in a 350 degree oven for 30-40 minutes. I usually don't preheat, and ovens vary. Just make sure the garlic is soft enough to mash with a fork, but not burnt.


Add 1/2 cup of Vegenaise and mix with the garlic and jalepeno


For the burgers you need:

2 15 oz cans drained black beans
1/2 cup vital wheat gluten
1/2 cup whole wheat breadcrumbs
Olive oil for sauteing
1/2 diced red onion
1 ts cumin
1 ts paprika
1 ts salt
1/2 cup chopped fresh parsley
1/4 cup water

Put all ingredients except for the olive oil in a food processor and pulse until everthing is incorporated. Form into 8-10 patties, depending on size. I arranged mine in a large rectangular tupperware in two layers. I put parchment paper above the first layer to keep them seperated from the second layer. Then I put them in the fridge several hours before dinner. I like to do things ahead of time as often as possible.
In a non-stick skillet heat olive oil over medium high heat. I just bought an awesome eco-friendly non-stick pan, so all I need is a light spray of oil for each batch. Cook for 3 minutes on each side, or until golden brown and crispy. Arrange on a bun with some Aoli, a crisp lettuce leaf, and whatever pleases you! 

For dessert, Jason has been begging me to make him a blackberry cobbler. He fancies himself a grizzly bear I think! Don't judge me by the Bisquick, I needed to finish the box I had in my pantry! I will make a healthier version in the future with whole grain flour, but I must say this was divine, and so easy.
I modified this recipe, very easy to veganize. I just used a cup of Bisquick for the dry ingredients, and used 6 Tbs coconut oil instead of the 1/2 cup of butter. I used less than 1/2 cup of oil because Bisquick already has oil in the mix, the hydrogenated kind! I know, I'm not doing a very good job of selling it, but it was so good. We didn't have any coconut ice cream, but it would be a perfect friend to this cobbler. Oh, and I used soy milk instead of real milk. I'm sure any plant milk will do. Mine only took 45 minutes to bake. Try it! Its yummy!